Posted By: Matt Lewis
Last Updated: Wednesday July 23, 2025
So you have a fresh new site and WordPress hosting (hopefully with us) and are looking for your next steps… We’ve got you covered!
Welcome to the first part of our series for brand-new WordPress users! In this initial guide, we’ll focus on essential setup and “house cleaning” steps, helping you transform your default WordPress installation into a functional website. By the end of this first part you’ll have chosen a theme and have made your first post!
For this guide, we’ll walk through setting up a WordPress site for a fictional restaurant called “Hawk’s Hamburger Shop”. As we go, just swap out our example details for your own business’s information.
After logging in, you might feel a bit overwhelmed by everything on screen. Don’t worry, that’s completely normal! Once you’re all set up, you’ll find yourself spending most of your time in just one or two specific sections of this control panel.
Your first step is going to be to mouse over or click Settings in the left hand menu, and then select General. You should see something like this:
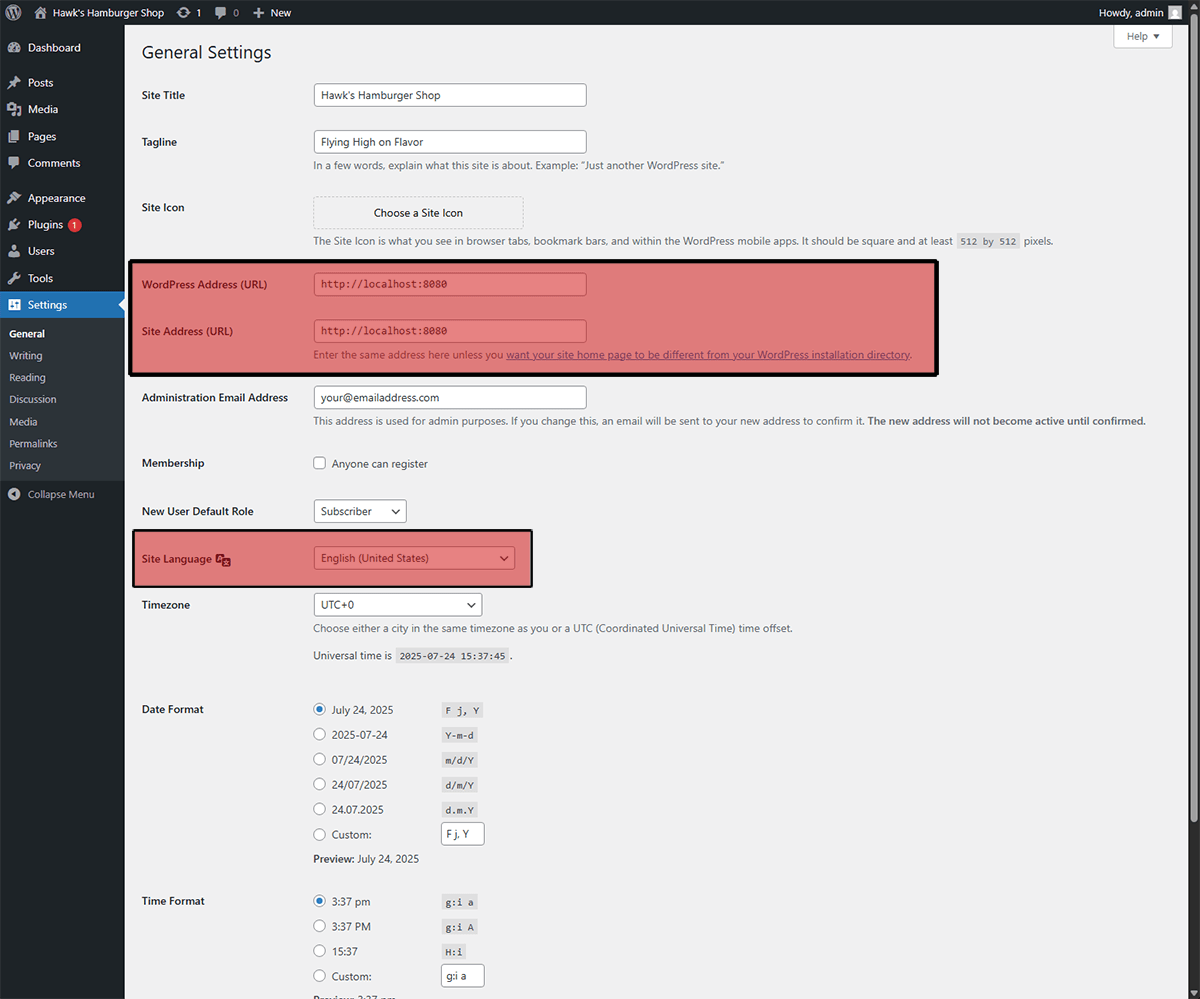
Site Title: This is the main name of your website. It shows up in the browser tab, search results, and in your site’s header (depending on your theme). Keep it short, memorable, and relevant.
Tagline: Think of this as your site’s slogan. Some themes display it under your site title or in the footer. Keep it short and descriptive. You can always tweak it later.
Site Icon: This is the small icon (also called a favicon) that appears in browser tabs, bookmarks, and on mobile home screens. If you don’t have a logo yet, you can skip this for now, but adding one later helps make your site feel more professional and recognizable.
WordPress Address (URL): This is the URL where your site is hosted. DO NOT change this unlesss you know what you are doing as this can break your entire site.
Site Address: This is the URL people visit to access your site. It’s often the same as the WordPress Address, but in some setups (like if WordPress is installed in a subfolder), it can differ. Like above: don’t touch this unless you know exactly what you’re doing.
Administration Email Address: WordPress uses this to send you important updates like password resets, comment moderation, and plugin alerts. Make sure it’s a valid, monitored inbox. If you change it, you’ll need to confirm via email before the update takes effect.
Membership: This controls whether anyone can register for an account on your site. Unless you’re running something like a discussion forum, keep this unchecked to avoid spam signups.
New User Default Role: If registration is enabled this controls what new users can do. Leave this set to subscriber unless you have a great reason not to. Setting this to administrator will lead to your site being hacked very quickly.
Site Language: This changes the language of your WordPress dashboard. It won’t affect your content, just the backend interface. Only change it if you need to, and make sure you can read the language you pick.
Timezone: Set this to match your local time. Scroll past the UTC options and choose a named timezone like America/New_York or Europe/London. This affects scheduling for posts, backups, and more.
Date Format: / Time Format: This is up to you, pick the format you want your posts and timestamps to use. Some themes show dates on blog posts, others don’t.
Week Starts On: This controls how weeks display in calendars (e.g. Sunday vs. Monday as the first column). Most U.S. users prefer Sunday. Pick what feels natural for you.
Once you’re happy with your changes scroll down and click the blue “Save Changes” button at the bottom of the page.
Now let’s make your URLs cleaner and more user-friendly.
By default, WordPress uses a structure like yoursite.com/?p=53. However, this isn’t very readable or SEO-friendly. To fix this, we’ll change your Permalink structure to Post name, which will give your posts clean and easy-to-read URLs like:
yoursite.com/our-first-blog-postinstead of:
yoursite.com/?p=53To access this setting, click Settings in the left menu, then choose Permalinks.
Once the page loads, locate the Permalink structure section. Select Post name by clicking the circle next to it, then scroll down and click Save Changes.
High five! You just updated the base configuration of your site. Let’s move on and create your first post.
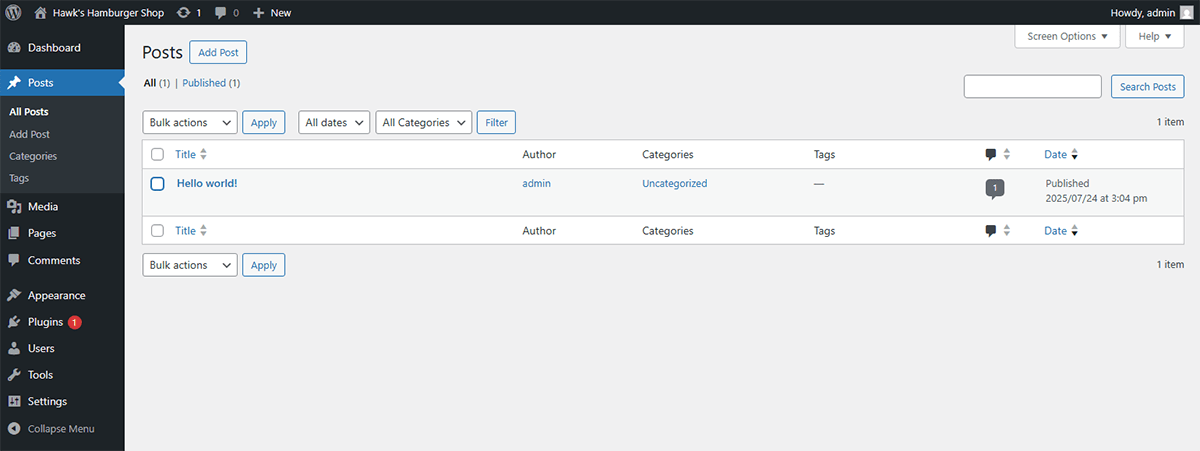
The first thing we’re going to do is delete the default Hello world! post. This placeholder comes with every fresh WordPress install, and we don’t want that showing up when visitors land on your site.
To delete the default post, check the box to the left of “Hello world!”. Next, open the Bulk actions dropdown, choose Move to Trash, and then click Apply.
Nice, the default post is gone! Now let’s replace it with your very first post.
Click the Add New button at the top of the Posts page.
You might see a popup welcoming you to the WordPress block editor. If it appears, just click through the prompts using Next, then hit Get Started when you reach the end.
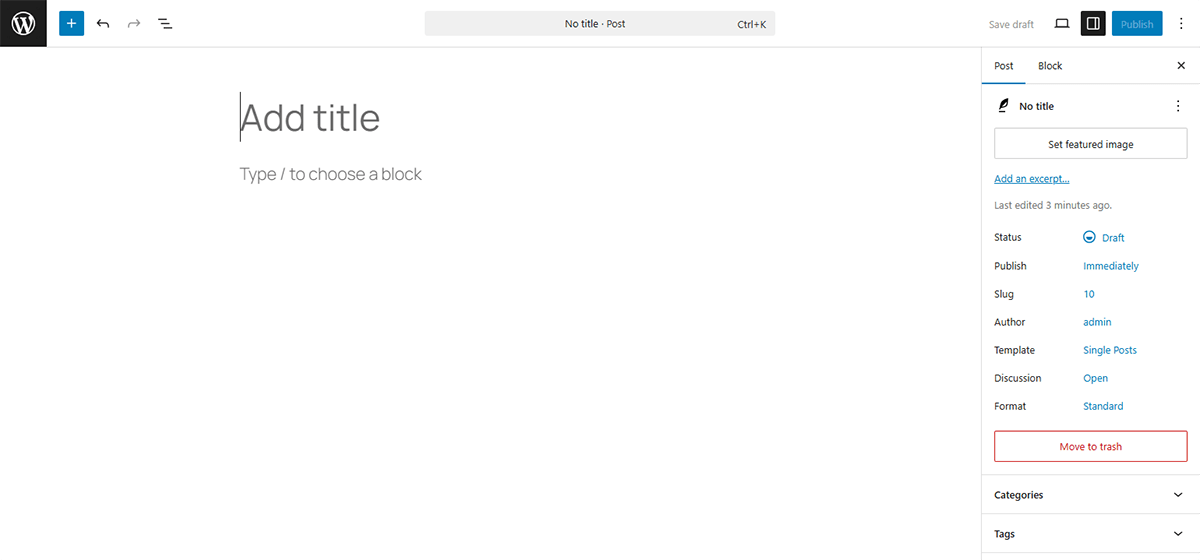
Content Area This is where you write and build your post using WordPress’s block editor. It works a lot like a WYSIWYG editor, what you see here is very close to how it will appear to visitors on your site, depending on your theme.
Add title: This is where you enter the title of your post. It’s the first thing people will see, and WordPress uses it to generate your post’s URL so make it short, clear, and attention-grabbing.
Type / to choose a block: This is where you add the actual content of your post. Click the + button (in the black box to the right) to add blocks like text, images, headings, lists, and more.
Post Settings (The right sidebar)
Status: This shows that your post is currently a Draft. This means that only you can see it until it is published.
Publish: Lets you schedule the post to go live at a specific time. If you leave this set to Immediately, your post will be published as soon as you click the Publish button in the top right.
Slug: This is the URL for your post. WordPress will generate it from your title, but you can click and edit it if you want a cleaner or shorter URL.
Author: Shows who wrote the post. By default, this will be you.
Template: Controls the layout of the post. You can ignore this for now. It becomes useful later when you’re building reusable or visually distinct layouts.
Discussion: This lets you enable or disable comments on the post. I recommend turning this off (Closed) for now to avoid spam until your site is more established.
Format: Defines the type of post you’re writing. You can leave this set to Standard.
Categories / Tags: These help organize your posts and make it easier for visitors to find related content. For this first post, you can leave them blank, we’ll come back to this later when you have more content.
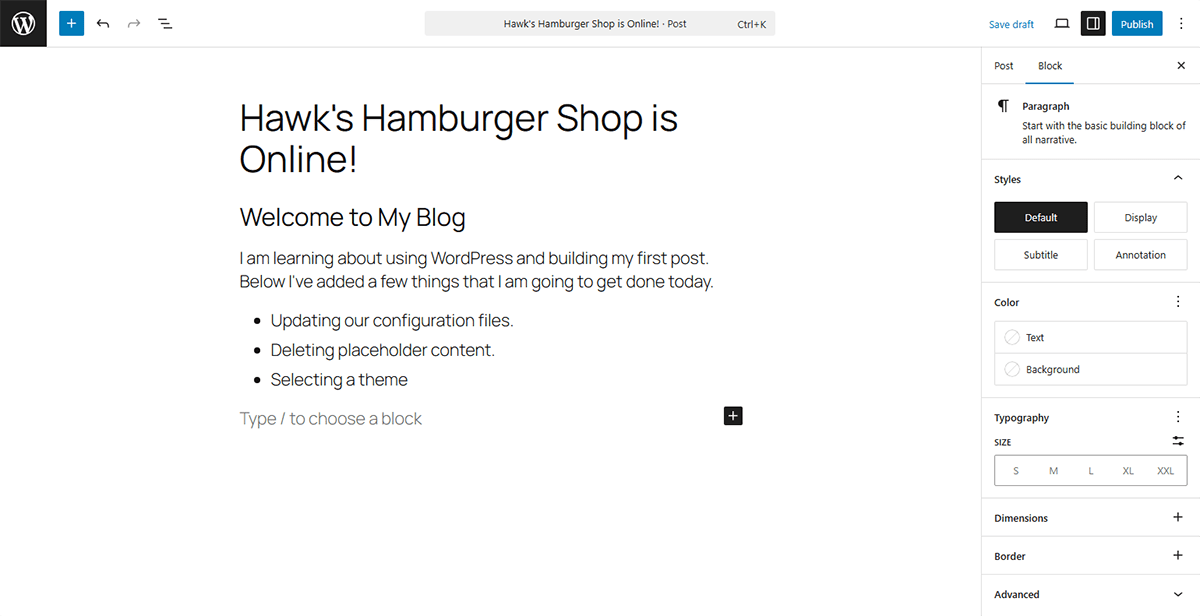
Lets write your first post!
Click the Title area and type out a short memorable title for your first post.
Next, click the black + button to the right of the “Type / to choose a block” field. This opens up a menu of block types you can add, like Heading, Paragraph, List, Quote, and more.
Try this:
Add a Heading block and type something like “Welcome to My Blog”
Add a Paragraph block below it and write a short intro
Add a List block with a few bullet points (maybe about what you’ll post in the future)
Don’t get hung up on making this perfect. This is your playground and you can always go back and change your post later.
Once you’re happy with your creation, click the blue Publish button in the top-right corner. You might have to confirm details and press Publish once more.
Now visit the main page of your website you will see your first blog post in all its glory! Nice job!
Pages are different from posts, they’re meant to be static, permanent fixtures on your site. Think of pages like About Us, Contact, or Services We Offer… content that doesn’t change often and doesn’t appear in your blog feed.
To get started, click Pages in the left-hand menu, then select All Pages.
You’ll likely see a couple of default pages that come with WordPress. Let’s clean those up.
Click the checkbox next to Title at the top of the list to select all the pages. Then open the Bulk actions dropdown, choose Move to Trash, and click Apply.
Nice! The default clutter is gone. Now let’s add one of your own.
Click the Add New button at the top of the page to create your first custom page.
A “Choose a pattern” popup may appear, just close it by clicking the X in the top right corner. Patterns are a powerful tool for building visually rich layouts, and we’ll cover those later when we get into themes.
You’ll now see the same editor you used earlier for your first post. In the Add title area, type About Us, and add some content blocks below it just like you did before.
Once you’re satisfied, click Publish in the top-right corner. You’ll likely need to confirm by clicking Publish again.
Let’s add one more page to give us some variety.
Click the WordPress logo in the top left to return to the Pages screen. Then click Add New again. You’ll probably have to close the Choose a pattern popup once more.
For this page, use any title you’d like keep it short, because it will appear in your site’s main menu. Add some content below the title, then click the blue Publish button (twice, if prompted).
If you visit your site now, you should see your About Us page and your second page listed in the main navigation menu, usually at the top right.
Themes control the overall look and feel of your site… layout, fonts, colors, menus, everything. Right now, your site is running a basic default theme, so it’s probably looking pretty minimal and plain.
We’ll dive deeper into choosing and customizing themes in the next part of this guide, but for now let’s get familiar with where themes live in your dashboard.
In the left-hand menu, click Appearance, then select Themes.
You’ll be taken to a page showing all your currently installed themes. If you hover over any theme, you’ll see two options: Live Preview and Activate.
Live Preview: Lets you see what your site would look like with that theme, but only you see the change.
Activate: Makes that theme live for all visitors to your site instantly.
If you click Add Theme, you’ll be able to browse thousands of free themes available through WordPress. Don’t worry about picking the perfect one right now. Feel free to install a few and test them out, you can always switch back or reset things later.
If something breaks or looks weird, don’t stress. You can always change the theme back or reset if needed.
Some Things to Try Before Moving On:
Install and preview a few different themes to see what styles you like.
Take note of what you like (or don’t) about each layout.
Find an image you’d like to use for your About page or next blog post, we’ll be adding media soon.
Brainstorm a few post ideas you’d like to write about.
Experiment! Break stuff. Learn. Reinstalling WordPress is easy, and hands-on experience is the fastest way to improve
Using the Post name setting gives your URLs a clean, readable format like: yoursite.com/about-us
This is much better for visitors and search engines like Google than the default structure of:?p=123
We’ll dive deeper into this in the next part of the guide, but here’s the quick version:
Click Customize on your active theme, then click directly on your site’s menu. This will open the menu editor in the right panel.
From there, you can drag and drop to reorder pages, remove ones you don’t want, or nest pages under others to create dropdowns.
It’s simple and visual—just click around and experiment!
By hosting with Hawk Host, you’ll have access to our one-click LiteSpeed Cache Plugin for WordPress, which is built and optimized for our hosting environment. See the benchmark data here.
Enabling the LiteSpeed Cache Plugin for WordPress will immediately improve your performance, and help scale your site to handle hundreds of thousands of hits per day!


 Shared Web Hosting
Simple, secure, and reliable cloud hosting
Shared Web Hosting
Simple, secure, and reliable cloud hosting Semi-Dedicated Cloud Hosting
Higher power & more resources
Semi-Dedicated Cloud Hosting
Higher power & more resources Reseller Cloud Web Hosting
White label & fully customizable
Reseller Cloud Web Hosting
White label & fully customizable